
PROFESSIONAL WEB SERVICES
Builder Jira Workflow
*Under no circumstances should Builders email or communicate directly with customers.*
*Please rely on our Website Specialists to communicate with our customers.*
Care/Post Publish/Legacy - New Ticket
- Middle-Click (to open in new tab) the link in the Summary Column
- Once open, click the dropdown in the top right corner that says "Ready" and choose “In Progress”. This will assign the ticket to you, if it is not already, and move it from the Care – New Ticket bucket to your My Tickets in Progress
- Add a Comment to the ticket indicating you have begun work (i.e. Start, Working, Commencing, etc…)
- When you have completed all the tasks click on the dropdown in the top right that says "In Progress" and choose “Design Complete – Send for QA”
- In the pop up add the total time it took to complete the incident, leave any notes you may have, and a comment indicating that you have completed the work (i.e. Complete, Done, Finished, etc…)
Note:
- If your ticket is marked with the label "GoDaddy_QA", please submit a Non-Technical Clarification once you have completed all the tasks rather than closing it. This typically means the WS wants to review it before it is sent to the customer.
- Once you complete a ticket, a completion email gets auto sent to the customer. Any notes you have left, will NOT be relayed. If you need to have notes relayed to the customer, please submit a Non-Technical Clarification so a WS can reach out to inform the customer.
Care Clarification Needed
If you need a rep to reach out to the customer in order to finish the ticket or to inform the customer of anything, such as platform limitations or needing additional information about a request, click on the "In Progress" dropdown and choose “Clarification Needed”
Builders are responsible for making decisions based on the content provided and the requests received. Before sending a Non-Technical Clarification make sure you have made every attempt to understand the issue thoroughly.
- In the dropdown for Technical Clarification, select the “No” option. This will send the ticket to the Website Specialists to reach out to the customer.
- In the Internal Comments section use the Panel Template to convey notes about what you need the Website Specialist to speak with the customer about. If it is just to inform the customer of something and all tasks have been completed, add in a comment that the ticket may be closed after the clarification has been completed. This will help the QA process move along more quickly.
- Once the clarification has been completed on the Website Specialist side, it will come back into our bucket for New Care Tickets.
- Note: It does not auto assign to the last builder. If you see a ticket come in that you requested a clarification for please grab it, as you probably know more about the ticket than a new person picking it up.
- Click the "Ready" dropdown and choose “In Progress”, leave your note indicating your working on the ticket, then once you have completed everything click the button at the top that says “Design Complete – Send for QA” leaving any notes you may have, including a completion note.
Builders are expected to be skilled in technical troubleshooting for our websites, software, plugins, and applications. Do not hesitate to reach out to your team and leadership to find solutions to technical issues first.
- If the ticket needs to go to a Builder 3 for technical troubleshooting, such as Beaver Builder not loading, Click the "In Progress" dropdown and choose "Clarification Needed"
- Select the “Yes” option in the Technical Clarification dropdown. This will send the tickets to our internal Builder 3’s to troubleshoot.
- Using the Panel Template, leave notes in the ticket about the issues you have encountered.
- After you have left your notes, click on the “Clarification Needed” button.
- Once the clarification has been completed on the Builder 3 side, it will come back into our bucket for New Care Tickets.
- Note: It does not auto assign to the last builder. If you see a ticket come in that you requested a clarification for please grab it, as you probably know more about the ticket than a new person picking it up.
- Click the "Ready" dropdown and choose “In Progress”, leave your note indicating your working on the ticket, then once you have completed everything click the dropdown at the top that says "In Progress" and choose “Design Complete – Send for QA” leaving any notes you may have, including a completion note.
New Build – New Ticket
- Middle click (Open in a new tab) the second link in the summary tab ending in “- Build”
- At the top of the page click on the dropdown that says "Ready" and choose “In Progress”
- Leave an internal comment indicating you have begun work
- Once all possible work has been completed, make sure you QA yourself (https://wdsdesigns.com/qa-check/) before sending the ticket to QA to avoid QA sending it back to us. Make sure to notate any items that you were unable to address and why.
- Click on the "In Progress" dropdown and choose “Send for QA”
- Make sure your Site Preview Link includes the whole URL (including the http://). This will be more helpful in the long run to just click on the link instead of copy/pasting it.
- Leave any notes you have in the Builder Clarifications section on the pop up, and it is good practice to copy and paste the notes to internal comments.
- Click the “Send For QA” button.
Do not send for non technical clarifications. They will not go to anyone and get lost in the Matrix
Builders are expected to be skilled in technical troubleshooting for our websites, software, plugins, and applications. Do not hesitate to reach out to your team and leadership to find solutions to technical issues first.
- If the ticket needs to go to a Builder 3 for technical troubleshooting, such as Beaver Builder not loading, Click the "In Progress" dropdown and choose "Clarification Needed"
- Select the “Yes” option in the Technical Clarification dropdown. This will send the tickets to our internal Builder 3’s to troubleshoot.
- Using the Panel Template, leave notes in the ticket about the issues you have encountered.
- After you have left your notes, click on the “Clarification Needed” button.
- Once the clarification has been completed on the Builder 3 side, it will come back into our bucket for New Care Tickets.
- Note: It does not auto assign to the last builder. If you see a ticket come in that you requested a clarification for please grab it, as you probably know more about the ticket than a new person picking it up.
- Click the "Ready" dropdown and choose “In Progress”, leave your note indicating your working on the ticket, then once you have completed everything click the dropdown at the top that says "In Progress" and choose “Design Complete – Send for QA” leaving any notes you may have, including a completion note.
- If the ticket has been returned to you from the QA team as needs edits, start by clicking on the "Apply Edits" button at the top.
- Notate that you are starting work.
- After the work has been completed, leave notes about what you did or did not do and why.
- Include a completion note.
- Then click the "Send For QA" button at the top.
- Once more on the pop up, if you have any notes to add the build ticket, add them here and click the "Send For QA" button once more.
New Build – Revisions Awaiting Builder
- Middle click (Open in a new tab) the second link in the summary tab ending in “- Build Revisions” and the number of revisions
- In the top right corner of the page click on the "Ready" dropdown and choose “In Progress”
- Leave an internal comment indicating you have begun work
- Once you have completed the revisions, click on the "In Progress" dropdown and choose “Send for QA”
- Input your time spent on the ticket.
- Make sure your Site Preview Link includes the whole URL (including the http://). This will be more helpful in the long run to just click on the link instead of copy/pasting it.
- In the Builder Clarifications section of the pop up, delete any existing notes that may be there and then add any notes you may have, and it is good practice to copy and paste the notes to internal comments. Make sure to notate any items that you were unable to address and why.
- Choose one of the options from the Builder Notes dropdown. Make sure to use these, as they are vital to tracking and improving our process.
- Request completed - no notes
- Request Completed - Items need to be done differently than requested
- Request Completed - Items had to be adjusted to look better
- Request could not be completed as requested
- Missing Items
- Click the “Send For QA” button again.
Do not send for non technical clarifications. They will not go to anyone and get lost in the Matrix.
Builders are expected to be skilled in technical troubleshooting for our websites, software, plugins, and applications. Do not hesitate to reach out to your team and leadership to find solutions to technical issues first.
- If the ticket needs to go to a Builder 3 for technical troubleshooting, such as Beaver Builder not loading, Click the "In Progress" dropdown and choose "Clarification Needed"
- Select the “Yes” option in the Technical Clarification dropdown. This will send the tickets to our internal Builder 3’s to troubleshoot.
- Using the Panel Template, leave notes in the ticket about the issues you have encountered.
- After you have left your notes, click on the “Clarification Needed” button.
- Once the clarification has been completed on the Builder 3 side, it will come back into our bucket for New Care Tickets.
- Note: It does not auto assign to the last builder. If you see a ticket come in that you requested a clarification for please grab it, as you probably know more about the ticket than a new person picking it up.
- Click the "Ready" dropdown and choose “In Progress”, leave your note indicating your working on the ticket, then once you have completed everything click the dropdown at the top that says "In Progress" and choose “Design Complete – Send for QA” leaving any notes you may have, including a completion note.
Care – Needs QA/W + M Needs QA
- Middle click (Open in a new tab) the link under Summary
- Click on the dropdown in the top right that says "Ready for QA" and choose “QA In Progress”. This will assign the ticket to you.
- Leave a comment indicating you are starting the QA
- Middle click the link at the top in the breadcrumb path, that starts with a “W” to open the parent ticket. You will also want to open the website preview.
- Make sure the changes requested have been made, once everything has been checked, click on the "Design QA" dropdown on the QA subtask ticket and choose "Done"
- If you need to send the ticket back to the builder to complete or send for a NTC, click on the "Design QA" dropdown and choose "Needs Edits". Click the Internal Comment tab, enter your notes, and click "Done"
Care – Vendor Tech Clarification Needed
- Middle click (Open in a new tab) the first link under Parent ending in - Website Care
- Scroll down to where you see the sub-tasks, next to the most recent task for the clarification click the dropdown that says "Ready" and then select “In Progress” This will assign the Clarification sub-task to you
- On the parent ticket you will see a note from “GoDaddy Services” about the question the Vendors have in order to complete the tasks.
- Once you have found an answer for the question that needs to go back to the Vendor, scroll to the top of the ticket and click the dropdown that says "Clarification" and choose "Provide Clarification". Leave an internal note in the modal pop up using the Panel Template below. This will close out the clarification and send it back to the vendor
If you do not see the option "Provide Clarification", it is probably because the ticket was sent straight to a Technical Clarification instead of going to the vendor team.
Typically this happens when prod catches a critical error ticket that the vendors would not be able to resolve. Verify this by making sure there is not a vendor sub-task (ex: VSPLASH-XXXX or AFFINITYX-XXX).
After verifying there is no Vendor sub-task, Choose "Provide Internal Clarification" from the Clarification dropdown and proceed as normal.

If there is a vendor sub-task, please reach out the Builder 3s for further guidance.
If the clarification has been in the Queue for less than 48 hours:
In this case the proper procedure is to close the existing Technical Clarification and have the vendors open a Non-Technical Clarification.
- Middle click (Open in a new tab) the first link under Parent ending in - Website Care
- Scroll down to where you see the sub-tasks, next to the most recent task for the clarification click the dropdown that says "Ready" and then select “In Progress” This will assign the Clarification sub-task to you
- Click the dropdown that says "Clarification" and choose "Provide Clarification".
- In the Internal Comment Tab, enter your notes:
- Please submit a Non-Technical Clarification so that the appropriate team can reach out the customer about the following notes:
[Paste your notes here]
- Please submit a Non-Technical Clarification so that the appropriate team can reach out the customer about the following notes:
- Click the "Done" button.
- This will close out the clarification and send it back to the vendor.
If the clarification has been in the Queue for more than 48 hours:
In these rare circumstances, it is a better customer experience to manually move the ticket to a Non-Technical Clarification.
- Middle click (Open in a new tab) the first link under Parent ending in - Website Care
- Scroll down to where you see the sub-tasks, next to the most recent task for the clarification click the dropdown that says "Ready" and then select “In Progress” This will assign the Clarification sub-task to you
- If you need to have a rep reach out to the customer to answer a question on a task before work can continue, leave an internal comment on the parent ticket using the Panel Template.
- Now scroll to the "Linked Issues" section and click on the Vendor ticket to open it.

- Open the clarification subtask on the Vendor ticket
- Navigate to the "Technical Clarification" Field on the right side menu, and change it from "Yes" to "No".
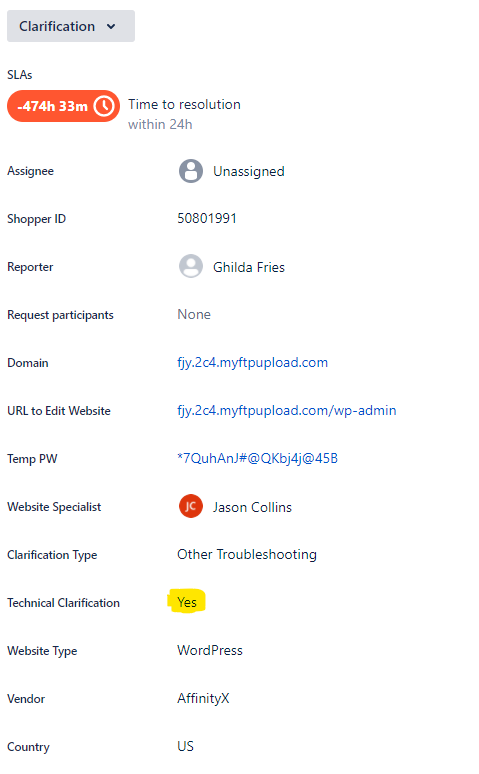
- For good practice, leave your notes in the sub-task as well.
- Navigate to Clarification Type Field and select appropriate Clarification subtype
- Then click on the "Clarification" dropdown and choose “Reopen”
- Middle click (Open in a new tab) the first link under Parent ending in - Website Care
- Scroll down to where you see the sub-tasks, next to the most recent task for the clarification click the dropdown that says "Ready" and then select “In Progress” This will assign the Clarification sub-task to you, if it is not already.
- The vendors will have left a note on the parent explaining why they want and extension and how long.
- Review and justify the request, if you have determined the request should be denied, please skip to step 8.
- If you are approving the extension, you will need to send the customer an email to inform them of the extension before closing the clarification so work can be resumed on the ticket.
*This is the only time it is acceptable to send and email to a customer. You may not use any other template than the one provided below, and you may not modify this template in any way other than adjusting the date. - On the Parent ticket click on the dropdown at the top that says "Clarification" and choose "Respond to Customer", copy and paste the below email template into the pop up and replace the "#/##" with the new completion date.
Hello,
I’m on your Website Care team here at GoDaddy. Our build team is advising us that due to the amount of changes you are requesting, they will need a bit of extra time to get everything completed. We are expecting a completion date of no later than end of day on #/##.
If you have questions or need help, we’re here! Email us by replying here or give us a call at 480-366-3336.
Thank you,
Marketing Services Team | GoDaddy Website Design Services - Click on the button "Respond to Customer" to send the email.
- Click the dropdown at the top that says "Waiting for Customer" and choose "Provide Clarification".
- In the pop up enter notes as an internal comment using one of the templates below:
- Approving extension:
SLA extension request to [Date] - APPROVED - Declining extension:
Extension Request denied, please complete the items within the standard SLA.
Justification:
Notes: - Adjusting extension:
SLA extension request to [Date] - DECLINED
SLA extension request to [Date] - APPROVED
Justification:
Notes:
- Approving extension:
- Click on the "Done" button.
- Go to the Website Care ticket. If the due date field is blank, then click Edit at the top left and modify it to be the newly approved due date then click update.
Edit > Due date > "MM/DD"
If it has been entered, simply verify the correct date has been entered. Adjust if necessary
- Middle click (Open in a new tab) the first link under Parent ending in - Website Care
- Scroll down to where you see the sub-tasks, next to the most recent task for the clarification click the dropdown that says "Ready" and then select “In Progress” This will assign the Clarification sub-task to you, if it is not already.
- Click the dropdown at the top that says "In Progress" and choose "Provide Clarification".
- In the pop up enter notes as an internal comment using the Panel Template saying "Task cannot be completed, please complete all other requests and return as a Non-Technical Clarification".
- Click on the "Done" button.
New Build – Vendor Tech Clarification Needed
- From the dashboard, find the "New Build - Vendor Tech Clarification Needed" queue and click on a ticket number in the "Key" column.

- Scroll down to the subtasks. You should see a vendor subtask for the stage of the new build (ie, Build or Revisions) as well as a subtask for "Provide Clarification".Important: These tickets remain in the teamwide bucket until they are complete, so even if somebody is already working on the clarification the ticket will appear in the bucket so you always need to check to make sure the "Provide Clarification" subtask is in "Ready" status. If somebody is working on it, it will be "In Progress" with them assigned to it.
Click on the "Ready" box next to the Clarification subtask and select "In Progress". If you refresh the screen you will now see that the Clarification subtask is assigned to you and shows a status of "In Progress".

- When responding to the clarification, you will leave your notes directly on the vendor ticket by clicking "Add internal note".

- This uses the "New View" rich text editor, so you will not need to use the panel layout you use on Care technical clarifications. It is recommended that you use the "Info Panel" tool to list the issue you're addressing, as well as your response and if there are multiple issues you can add a separator between them to improve readability.

- After you have left your note, you will need to locate the vendor's build subtask (may be "Build" or "Revisions") which should list a status of "Clarification" next to it. Click on "Clarification" and select "Back to Builder".

- This will return the build ticket to the vendor with a status of "Ready" and within a few minutes automation will update the "Provide Clarification" subtask to a status of "Done".


Panel Template
Please adjust the title and notes accordingly.
{panel:title=Technical Clarification 1 - Critical Error}


*All tasks completed except:*


*Page:* Home

*Instruction:* Add content from 3 pages on the live site onto the home page

*Issue:* Can't load page and getting a critical error on the home page only

*Steps taken to troubleshoot:*


* troubleshooting step 1 – updated plugins

* troubleshooting step 2 – uploaded .user.ini file

* troubleshooting step 3 – cleared cache from GD cORe dropdown.


{panel}