Taxes Setup Guide
Setting up Taxes in WooCommerce can be broken down into 3 steps:
Additional resources:
How to use this guide:
We’ve provided the Taxes Setup Guide as an easier way to walk customers through the tax setup process.
We can help with setting up tax rates in the WooCommerce settings and how the platform handles taxes based on these settings, but not when or what to charge.
We are not tax professionals. For specific advice when it comes to what or when to charge tax/VAT/GST etc, we recommend consulting with a tax professional or an accountant on what may be your best options.
Enabling Taxes
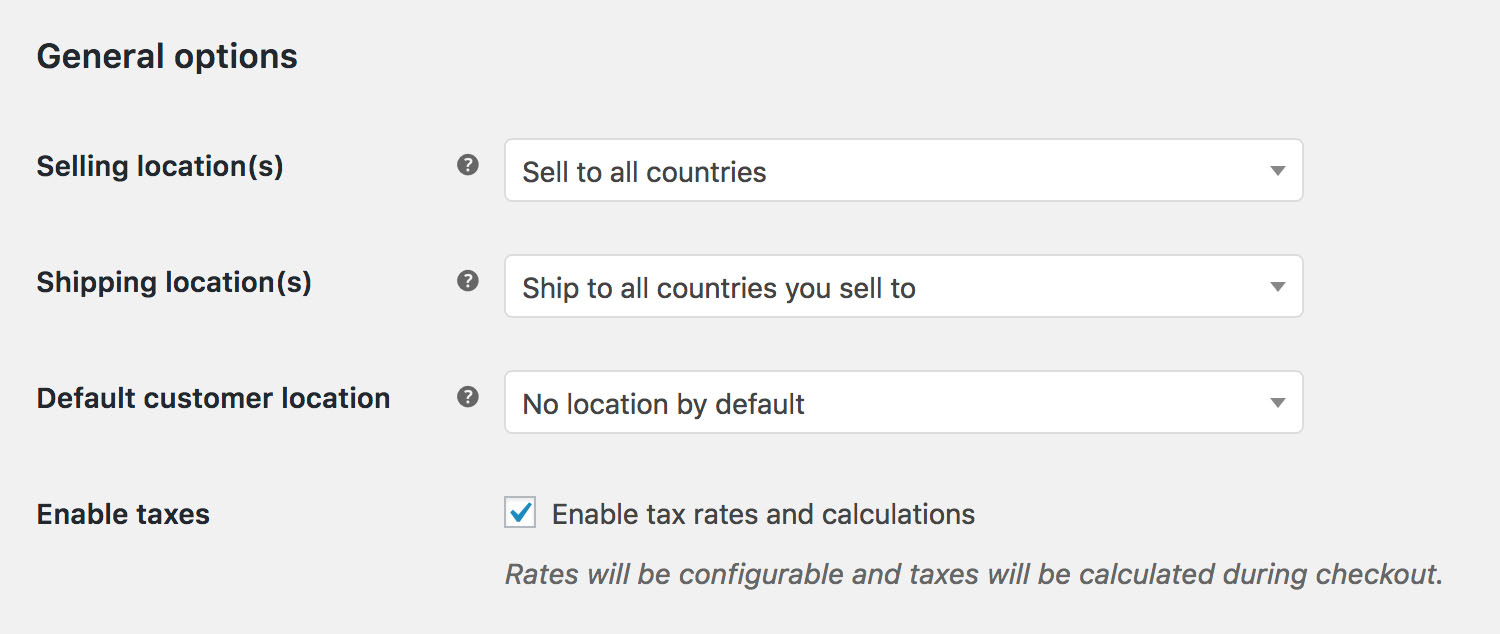
GET STARTED: Enabling taxes
- Go to: WooCommerce > Settings > General.
- Select the Enable Taxes and Tax Calculations checkbox.
- Save changes.
Configuring Tax Options
GET STARTED: Configuring tax options
Go to: WooCommerce > Settings > Tax. This tab is only visible if taxes are enabled.
The Tax tab displays several options that can be set to suit your needs — settings you choose are based on the tax jurisdiction under which your store is located.
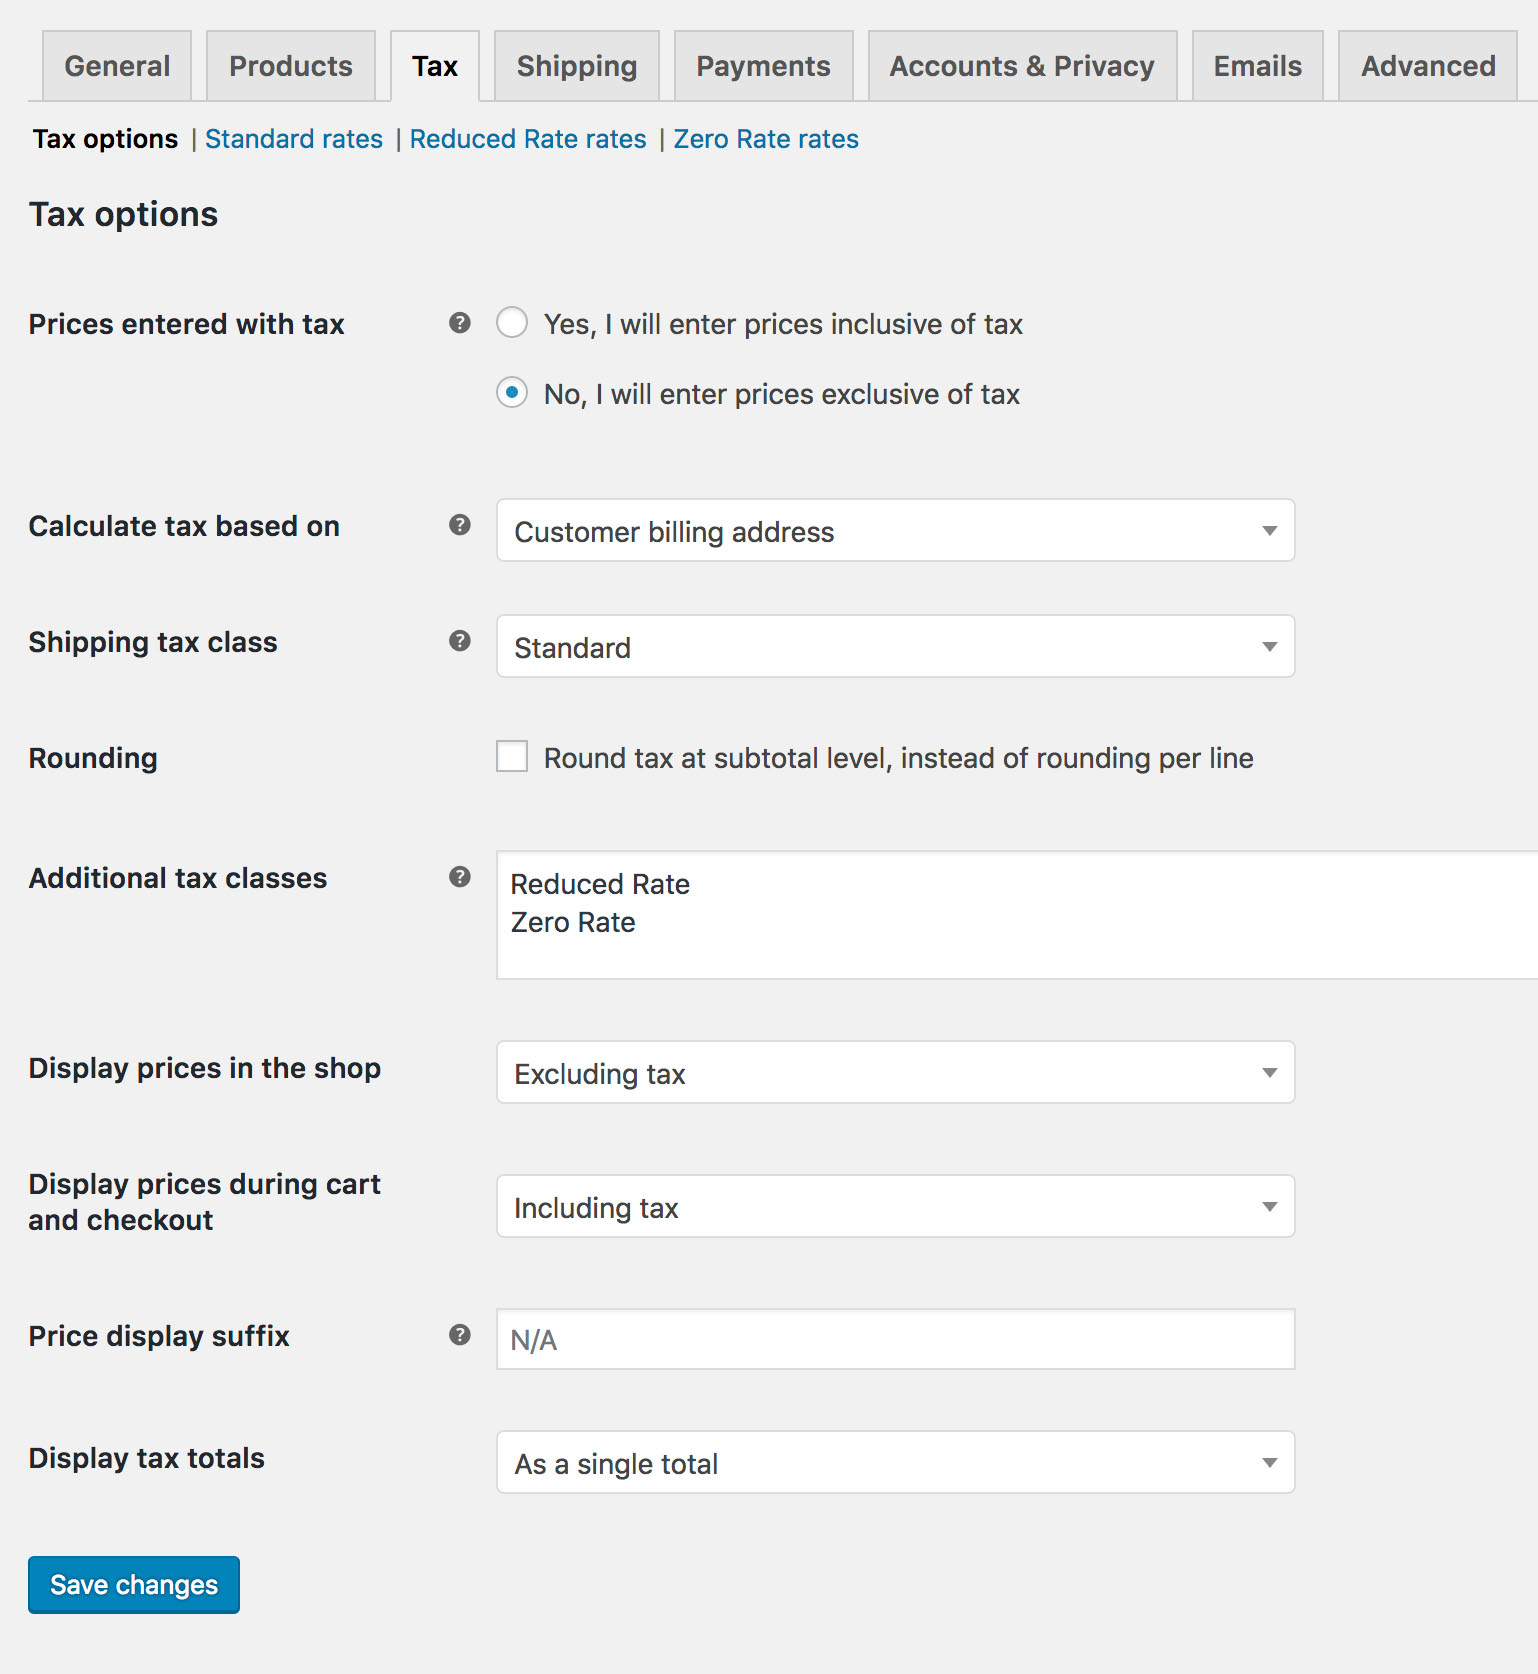
Use the accordions below if additional configuration is required.
Prices Entered With Tax
This option is perhaps the most important when managing taxes in your store, as it determines how you input product prices later on.
- “Yes, I will enter prices inclusive of tax” means that all catalog prices are input using your store’s base tax rate.
Example: Product price = $9.99 / Cart price = $9.99 tax is included in the product price - “No, I will enter prices exclusive of tax” would mean that your catalog prices need to be tax exclusive.
Example: Product price = $8.99 / Cart price = $9.99 tax is not included in product price and is added in cart
Display prices: in the shop/during cart and checkout
These options should match the selection made from above, for the Prices entered with tax.
- If Yes, I will enter prices inclusive of tax was selected then select the following options:
Display prices in the shop > Including Tax
Display prices during cart and checkout > Including Tax - If No, I will enter prices exclusive of tax was selected then select the following options:
Display prices in the shop > Excluding Tax
Display prices during cart and checkout > Excluding Tax
Calculate Tax Based On
This setting determines which address is used for tax calculations.
- Customer billing address
- Customer shipping address (default)
- Store base address
If you use store base address, taxes are always based on your store location and not your customer’s location.
Shipping Tax Class
In most setups, shipping tax class is inherited from the item being shipped, e.g., Shipping a reduced rate item such as baby clothes would also use a reduced rate. If this is not the case in your jurisdiction, choose a different tax class.
In the case of multiple tax rates in the order, the shipping tax will be applied as follows:
- If you have a product with the Standard rate in the order, it will be used for the shipping regardless if this rate is high or low;
- If you don’t have a product with the Standard rate in the order, then the first rate found in the Additional tax class section will be used for shipping.
The goal is to make sure that your highest rate is listed the first in the Additional tax class section if you don’t use the Standard class and if you need the highest tax rate to apply to shipping, for example.
Rounding
If you enable Rounding tax at subtotal level, instead of per line, the rounding is done at the Subtotal level. Check your tax jurisdiction to know if this is done.
Additional Tax Classes
Tax Classes are assigned to your products. In most cases, you want to use the default Standard class. If you sell goods that require a different tax class (i.e., Tax, except zero-rated products) you can add the classes here. To get started, we include Standard, Reduced Rate and Zero Rate tax classes.
Each class is listed at the top of the tax settings page – click a class to view tax rates assigned to the class.
Display Prices During Cart and Checkout
This option determines how prices are displayed in your cart and checkout pages – it works independently of your catalog prices. Choose from inclusive/exclusive tax display.
Note: The address field needs to be filled in to get tax calculations if you have a tax table that distinguishes between locations.
Price Display Suffix
Allows you to change display to: “Prices include __% tax/VAT” or anything appropriate for your store. You can use these two placeholders if you want to have text before and after the price:
{price_including_tax}{price_excluding_tax}
For example: “Price incl. VAT: {price_including_tax}” will display as: “Price incl. VAT: $15” (if that is the price, of course). So, if you’ve set the taxes to display excluding tax, you could add in small print what the tax inclusive of tax will look like:
Suffixes on Variable Products
This functionality is turned off at Variable product level because it’s not possible to “know” the prices including/excluding tax. Prices come from variations, which can have different tax classes. E.g. you have a variable product with 2 variations and both are priced at $10. However, one variation has a tax rate of 20% and one has a reduced rate of 10%. What is the price including tax?
The only way to show accurate prices would be to load the variation and get its price, which adds extra overhead and still has edge cases where the values would be inaccurate.
Variations (the price revealed when you’ve selected a variation) do support suffixes because variations have a tax class/rate.
Display Tax Totals
This determines if multiple taxes get displayed as one total during checkout, or as an itemized list of taxes.
Setting Up Tax Rates
GET STARTED: Setting up tax rates
Tax classes are displayed at the top of the tax screen. Click one to view tax rates for the class.
In the tax rates table, you can define tax rates (one per row). Click Insert Row to get started.
The wildcard character (*) in this context means “apply to any”, meaning it will apply regardless of what is entered in that field. Should you choose to replace it with something specific, the customer will have to match exactly what you put in order for it to match. E.g. if you put “Cape Town” as the city, but your customer types “Capetown”, it will not match and the tax rate will not apply to their address.
Each tax rate has these attributes:
- Country Code – 2 digit country code for the rate. Use ISO 3166-1 alpha-2 codes. Leave blank (*) to apply to all countries.
- State Code – 2 digit state code for the rate. See
i18n/states/COUNTRYCODE.phpfor supported states. For the US, use a 2 digit abbreviation e.g. AL. Leave blank (*) to apply to all states. - ZIP/Postcode – Enter postcodes for the rate. You may separate multiple values with a semi-colon (;), use wildcards to match several postcodes (e.g. PE* would match all postcodes starting with PE), and use numeric ranges (e.g. 2000…3000). Leave blank (*) to apply to all postcodes.
- City – Semi-colon separated list of cities for the rate. Leave blank (*) to apply to all cities.
- Rate % – Enter the tax rate, for example, 20.000 for a tax rate of 20%.
- Tax Name – Name your tax, e.g. VAT
- Priority – Choose a priority for this tax rate. Only 1 matching rate per priority will be used. To define multiple tax rates for a single area you need to specify a different priority per rate.
- Compound – If this rate is compound (applied on top of all prior taxes) check this box.
- Shipping – If this rate also applies to shipping, check this box.
Use the accordions below if additional configuration is required.
Tax rate examples
In this example, we have a 6% tax rate for all U.S. states except California, which has a 7% tax rate and a local tax rate of 2% for ZIP code 90210. Notice the priorities — this demonstrates how you can ‘layer’ rates on top of another.

Importing and exporting rates
There are Import CSV and Export CSV buttons below the table with the rates. You can use them to import and export tax rates to and from a CSV file.
The CSV file for importing requires 10 columns;
country code, state code, postcodes, cities, rate, tax name, priority, compound, shipping, tax class
Leave tax class blank for standard rates.
Below we’ve provided a sample tax rate CSV to import for the United States based on state tax only. This should not be used for production/live purposes, as tax rates frequently change. Double-check any rate for accuracy before using.
Deleting tax rates
If you incorrectly added tax rates or the CSV import has incorrectly added tax lines, this information needs to be deleted.
To delete:
- Go to: WooCommerce > Settings > Tax > Your Tax Rates (Standard, Reduced Rate, Zero Rate)
- Select the incorrect lines by clicking on them. They are highlighted in yellow.
- Select Remove Selected Rows. This deletes the highlighted row(s).
- Save changes.
If you want to delete all tax rates at once, use Delete WooCommerce Tax Rates in WooCommerce > Status > Tools.