Technical QA Process
Outlined below are the steps when completing a Tech QA on a site that was just delivered by a builder.
Links and Resources:
- Form and Rubric: http://wdsdesigns.com/tech-qa-rubric/
- Tier 1 – QA Agent Review Completed Label: TechQA_Tier1_Completed
- Tier 2 – Builder 1 Label: TechQA_Tier2
- Tier 2 – Builder 1 Review Completed Label: TechQA_Tier2_Complete
- Tier 3 – Builder 3 Label: TechQA_Tier3
- Tier 3 – Builder 3 Review Completed Label: TechQA_Tier3_Complete
- Re-Check Label: TechQA_Re-Check
- Re-Check Completed Label: TechQA_Re-Check_Completed
Tier 1 – QA Agent
Overview:
The goal of this check is to ensure the WordPress backend is set up correctly in order to avoid a poor customer experience and escalations down the road.
Follow your normal process for finding and reviewing new builds needing QA.
Once you have completed your standard QA Check, please open the Tech QA Form
These checks will be done inside the WordPress Dashboard looking at common settings and configurations.
Login:
For the time being please use the provided temp Password in the ticket to log in to the site.
The Checklist:
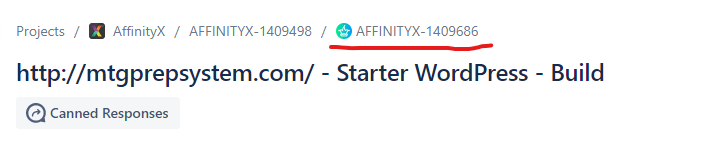
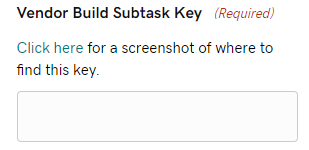
Enter the Vendor Build Subtask Key in the first field. This can be found in the breadcrumbs at the top of the ticket
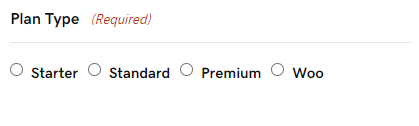
Enter the plan type, this is important as the fields will change based on the plan type
Choose Tier 1 – QA Team from the Review Tier field

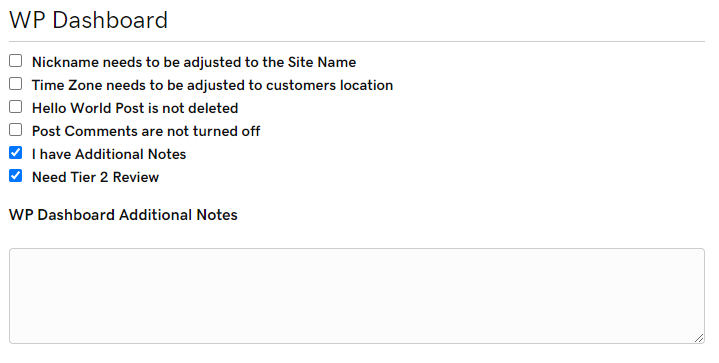
Below will be your checklist.
For any items that have not been completed correctly, check the check box for that item.
If you are not sure where to look for that item or maybe don’t quite understand, check out the Tech QA Rubric accordion on the right side of the page for more details.
If you are still not sure if this item is correct, or you believe a builder should take a look at the item, check the box for “I have Additional Notes” AND “Need Tier 2 Review”. Put your note in the Additional Notes field for that section.
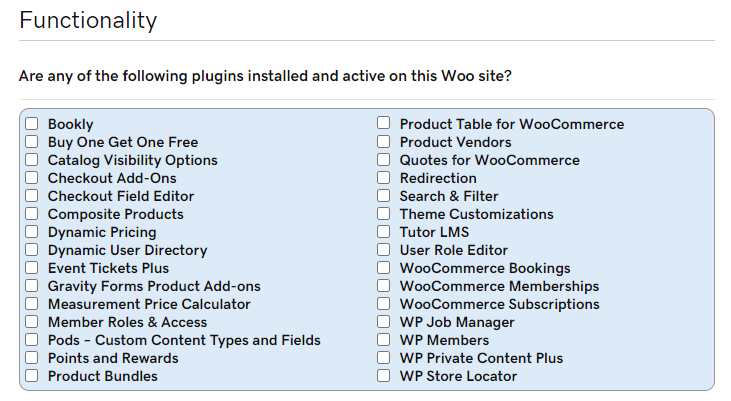
In the functionality section, you will find a field with a list of plugins, this adjusts based on the plan type chosen and does not contain all of the plugins we offer. It only contains the plugins that have complex set ups or have been known to cause issues. If any of the plugins are present on the site, it should automatically be escalated to Tier 2 for review.
Complete:
Once all items have been checked, you will have the option to email the form to yourself. This is completely optional and would be for your records only.
After the submission, notes about the checklist will auto generate. Simply copy and paste these notes on to the Vendor Build Subtask.
If any of these notes need to be read by the Website Specialist, please make sure they are clearly marked as a WS Note and Paste on the WDS Parent Ticket.
Once you are done, regardless of if an escalation is needed, make sure you add the label “TechQA_Tier1_Completed” to the Vendor Build Subtask.
- If the ticket needs to be escalated to Tier 2, leave your ticket in Internal QA or Design QA, and add the label “TechQA_Tier2” to the Vendor Build Subtask.
- If the ticket needs to go back to the builder for edits, Put your label in place, drop your notes on both the parent and the build subtask, then move the ticket to Needs Edits.
- If the ticket does not need any edits, leave your label and notes on the ticket and complete the ticket as normal.
Tier 2 – Builder 1
Overview
You have received this review request because a QA agent has identified a potential issue with the backend set up of the WordPress site.
You will be assigned a Special Projects ticket with all the information. Move this ticket to In Progress when you begin your review (Do not move the vendor build ticket).
Review the notes the QA Agent left on the ticket (These should be listed on your special projects ticket). The notes listed under the Tier 2 Review titles will be the most important notes to look at, but you should double check there are no other items that need to be reviewed.
The Checklist
Open the Tech QA checklist
Enter the Vendor Build Subtask Key in the first field. This can be found in the breadcrumbs at the top of the ticket
Enter the plan type, this is important as the fields will change based on the plan type
Choose Tier 2 – Builder 1 Team

Enter the notes left by the QA agent to review in the first box, then complete your review.
If you have notes to leave about the individual section, notate appropriately.
If you need to have a Builder 3 take a look, check the box for Need Tier 3 Review for the appropriate section. Your notes will be saved in a new section for the Builder 3 to review, much like the Tier 2 notes from QA.
There may be a simple check off from the QA agent to make sure a plugin is set up correctly. Make sure you are fully aware of the customers end goal and make sure the set up is correct. Again, you may escalate to a Builder 3 if you are not sure.
Complete
After you have reviewed everything, and completed the form, you have the option to send yourself a copy of the submission. This is completely optional, and for your records only.
After you submit, your notes will generate in an easy to copy format. Paste your notes on the Vendor Build Subtask.
If you have any notes for the WS or customer specifically, make sure you are calling them out in a way that is easy to see on the Parent Ticket.
If additional work needs to be done, make sure you are notating appropriately so the QA agent can send it back to the builder to complete the work.
Once you are done, regardless of if an escalation is needed, make sure you add the label “TechQA_Tier2_Completed” (Do not remove any other labels) to the Vendor Build Subtask.
- If the ticket needs to be escalated to Tier 3, leave the ticket in Internal QA or Design QA, and add the label “TechQA_Tier3” to the Vendor Build Subtask.
- If the ticket needs to go back to the builder for edits, all you need to do is notate and leave your completed label. The QA team will pick it back up and send to vendors.
- If the ticket does not need any edits, leave your label and notes on the ticket and QA will complete the ticket as normal.
Now you will move your Special Project ticket to Design QA (Do not move the vendor build ticket). This will go to Lindsay to review and complete so that you get credit for the work you have completed.
Tier 3 – Builder 3
Overview
You have received this review request because a Builder 1 has identified a potential issue with the backend set up of the WordPress site or needs.
Review the notes the Builder 1 left on the ticket. The notes listed under the Tier 3 Review titles will be the most important notes to look at, but you should double check there are no other items that need to be reviewed.
The Checklist
Open the Tech QA checklist
Enter the Vendor Build Subtask Key in the first field. This can be found in the breadcrumbs at the top of the ticket
Enter the plan type, this is important as the fields will change based on the plan type
Choose Tier 3 – Builder 3 Team

Enter the notes left by the Builder 1 to review in the first box, then complete your review.
If you have notes to leave about the individual section, notate appropriately.
Complete
After you have reviewed everything, and completed the form, you have the option to send yourself a copy of the submission. This is completely optional, and for your records only.
After you submit, your notes will generate in an easy to copy format. Paste your notes on the Vendor Build Subtask.
If you have any notes for the WS or customer specifically, make sure you are calling them out in a way that is easy to see on the WDS Parent Ticket.
If additional work needs to be done, make sure you are notating appropriately so the QA agent can send it back to the builder to complete the work.
Once you are done, regardless of if an escalation is needed, make sure you add the label “TechQA_Tier3_Completed” (Do not remove any other labels) to the Vendor Build Subtask.
- If the ticket needs to go back to the builder for edits, all you need to do is notate and leave your completed label. The QA team will pick it back up and send to vendors.
- If the ticket does not need any edits, leave your label and notes on the ticket and QA will complete the ticket as normal.
Re-Check – Builder 3
Overview
You have received this review request because a QA Agent is requesting a Re-Check for specific items.
Review the notes the QA Agent left on the ticket.
The Checklist
Open the Tech QA checklist
Enter the Vendor Build Subtask Key in the first field. This can be found in the breadcrumbs at the top of the ticket
Enter the plan type, this is important as the fields will change based on the plan type
Choose Re-Check Request

Enter the notes left by the QA Agent to review in the first box, then complete your review.
If you have notes to leave about the individual section, notate appropriately.
Complete
After you have reviewed everything, and completed the form, you have the option to send yourself a copy of the submission. This is completely optional, and for your records only.
After you submit, your notes will generate in an easy to copy format. Paste your notes on the Vendor Build Subtask.
If you have any notes for the WS or customer specifically, make sure you are calling them out in a way that is easy to see on the WDS Parent Ticket.
If additional work needs to be done, make sure you are notating appropriately so the QA agent can send it back to the builder to complete the work.
Once you are done, regardless of if an escalation is needed, make sure you add the label “TechQA_Re-Check_Completed” (Do not remove any other labels) to the Vendor Build Subtask.
- If the ticket needs to go back to the builder for edits, all you need to do is notate and leave your completed label. The QA team will pick it back up and send to vendors.
- If the ticket does not need any edits, leave your label and notes on the ticket and QA will complete the ticket as normal.
Completed Needs Edits – QA Agent
If a build comes back from Needs Edits, and you would like to have a builder review specific items.
- Notate the Vendor Build Subtask with the items you would like to have reviewed
- Leave your ticket in Design QA status
- Label the Vendor Build Subtask with “TechQA_Re-Check” (Do not remove any other labels).